

Introduction
When you have your web site or application running behind a domain, it is often a good idea to allow your users access to it via the regular domain name and the www subdomain. Meaning, they should be able to visit your domain with or without the “www.” prefix (e.g., example.com or www.example.com) in a web browser, and are served with the same content.
There are several ways to set this up. However, the best solution for consistency and SEO considerations is to choose the domain you prefer (regular or www) and redirect the other domain to the preferred domain. This type of redirect is called a “permanent redirect”, or “301 redirect”, and it can be easily set up by properly configuring your DNS resource records and web server software.
If you want to perform this type of redirect with Apache as your web server, you should follow this tutorial instead: Redirect www to non-www with Apache
Prerequisites
This tutorial assumes that you already have superuser privileges (i.e., sudo or root) on the server running NGINX. If you do not already have that set up, follow this tutorial: Initial Server Setup with CentOS
NGINX must also be pre-installed.
You should be able to add records to the DNS that manages your domain. If you do not already have a domain, you can buy one from a domain registrar and manage it using the registrar’s DNS or DigitalOcean’s DNS. In this tutorial, we will use the DigitalOcean DNS to create the necessary records.
If you got all this covered, let us start by configuring the DNS records.
Configuring DNS Records
To setup the required redirect (e.g., www.example.com to example.com or vice versa) you must have an A record for each name.
Open whatever you use to manage your DNS. In this example, we are using the DigitalOcean DNS.
If the domain (aka zone) record does not already exist, create one now. The hostname should be your own domain (e.g., example.com) and the IP address should be set to the public IP address of your NGINX server. This will automatically create an A record that points your domain to the IP address you specified. If you are using another system to manage your domain, you may need to add this manually.
Next, add another A record with “www” as the hostname (or “www.example.com” if the partial subdomain does not work), and specify the same IP address.
After both records are created, it should look like this:

NOTE: This will also work with CNAME records, but only if the A record for the canonical name points to the IP address of the NGINX web server.
Now your server should be available via the www and non-www domain, but we still need to set up the redirect.
Configure NGINX Redirect
Best practice with NGINX is to use a separate server block for a redirect like this (not shared with the server block of your main configuration), to hardcode everything, and not use regular expressions at all.
It may also be necessary to hardcode the domains if you are using HTTPS, because you must know in advance which certificates you are going to provide.
Open your NGINX server block configuration in an editor. We will add another config file in the NGINX include directory (/etc/nginx/conf.d) called redirect.conf:
sudo vi /etc/nginx/conf.d/redirect.confYour original server block should already be defined. Depending on your configuration, use one of the following options. Again, the recommended approach is option 1.
1. Seperate server with Hardcoded server_name
This solution is considered the best practice. To perform the 301 redirect, a new NGINX server block must be added pointing to the original server block.
If you want redirect users from www to a regular non-www domain, insert this configuration:
server {
    server_name www.example.com;
    return  301 $scheme://example.com$request_uri;
}
If you want redirect users from a regular non-www domain to a www domain, then add this server block:
server {
    server_name example.com;
    return 301 $scheme://www.example.com$request_uri;
}
Obviously, replace example.com with your own domain name.
2. Using Regular Expressions with server_name
If you have multiple sites you want to have the same policy regarding the www. prefix, then you can use regular expressions. However, this does not offer the best perform and the practice of using a separate server block would still stand.
NOTE: This solution becomes tricky if you use HTTPS, as you need to have a single certificate to cover all your domain names if you want this to work properly.
non-www to www w/ regex in a dedicated single server block for all sites:
server {
    server_name ~^(?!www\.)(?<domain>.+)$;
    return  301 $scheme://www.$domain$request_uri;
}
www to non-www w/ regex in a dedicated single server block for all sites:
server {
    server_name ~^www\.(?<domain>.+)$;
    return  301 $scheme://$domain$request_uri;
}
www to non-www w/ regex in a dedicated server block for only some sites:
If you need to restrict the regex to only cover a couple of domains, then you can use something like this to only match on those domains:
server {
    server_name ~^www\.(?<domain>(?:example\.org|example\.com|subdomain\.example\.net))$;
    return  301 $scheme://$domain$request_uri;
}
This example uses www.example.org, www.example.com and www.subdomain.example.net.
3. Add to Existing server Block
This final solution is not generally considered best practice; however, it still works and does the job.
In fact, if you are using HTTPS, then this solution may become easier to maintain. This prevents you from having to copy and paste a whole set of SSL directives between different server definitions and the snippets can instead be placed only into the required servers, making it easier to debug and maintain your sites.
non-www to www:
if ($host ~^ (?!www\.)(?<domain>.+)$) {
    return 301 $scheme://www.$domain$request_uri;
}
www to non-www:
if ($host ~^ www\.(?<domain>.+)$) {
    return 301 $scheme://$domain$request_uri;
}
Hardcoding a Single Preferred Domain:
If you want greater performance, as well as consistency between multiple domains a single server may use, it might still make sense to explicitly hardcode a single preferred domain:
if ($host != "example.com") {
    return 301 $scheme://example.com$request_uri;
}Note: If you are using HTTPS, make sure to put these under the settings for a TLS enabled server. Your non-TLS enabled server block should redirect to your TLS enabled server block like so:
if ($host ~^ www\.(?<domain>.+)$) {
    return 301 https://$domain$request_uri;
}
If you are not using HTTPS, why not? It is free and simple to setup! Check out our article on How to Setup SSL For Free to see just how easy it is.
Test
Regardless of which option you choose, save and exit.
To put the changes into effect, restart NGINX:
sudo systemctl restart nginxUse the below curl command to ensure that the non-www domain redirects to the www domain or vice versa. Replace example.com with your actual domain:
curl -I http://www.example.comYou should get a 301 Moved Permanently response, that shows the non-www redirect location, like this:
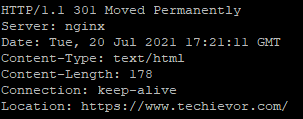
Of course, you should access your domain in a web browser (www and non-www) to be sure.
Conclusion
Congrats! Your permanent redirect in NGINX is now configured properly, and your users will be able to access your web server via the non-www and www domain.
If you any questions or thoughts on the tutorial, feel free to reach out in the comments below.
References
- http://nginx.org/r/server_name
- http://nginx.org/r/return
- http://nginx.org/en/docs/http/server_names.html
Additional Reading