

Introduction
MEAN is a software application stack made up of the following components:
- MongoDB, a NoSQL database with support for server-side JavaScript execution
- Express, a Node.js web application framework
- Angular, a web application framework suitable for developing dynamic, single-page applications
- NodeJS, an asynchronous event-driven framework suitable for building scalable network applications
Valery Karpov invented the term "MEAN" and derived the term from the first letter of each element. Valeri defined MEAN in this blog post, giving some motivation to choose to develop JavaScript applications with the help of the MEAN stack.
Preparing CentOS to run the MEAN Stack (MongoDB, Express, Angular, Node.js) applications is simple and only requires a couple of things to be installed – namely Angular-CLI, MongoDB and Node.js.
Express runs on top of Node.js so it isn't installed directly on CentOS, it's added via NPM (Node Package Manager) when you run npm install for an application. The npm install command looks at the dependencies section of the package.json file for application on the MEAN stack and downloads all that is required, which should include Express.
Angular is an open-source JavaScript front-end web application framework mainly for developing single-page applications. There’s some confusion regarding the name and version of Angular, initially it was started as AngularJS framework (which is still v1), but later it was completely re-written and released as Angular 2 in September 2016. In March 2017, Angular 2 was renamed as Angular. Angular is similar in that it’s not installed directly on CentOS and is added via NPM.
Angular-CLI (Command Line Interface), however, will need to be installed globally to create Angular projects and makes other development tasks easier. The Angular CLI helps us to create projects, generate application and library code, and perform a variety of ongoing development tasks such as testing, bundling, and deployment.
Prerequisites
To begin, you'll need to have the following:
- A CentOS 7 server with at least 4GB of RAM. Some of the components of the MEAN stack, like NPM, require a lot of memory.
- A sudo non-root user configured using this CentOS initial server setup guide.
1. Installing Dependencies
Because we'll be compiling applications from source and cloning a Git repository, we'll need to install some dependencies first. As we will be using NPM to install Angular CLI, it requires few build tools to compile and install packages. We will also need to install the Git package, which NPM depends on:
sudo yum -y install gcc c++ make gitNow that the dependencies are installed, we can install the first component of the stack, MongoDB.
2. Installing MongoDB
MongoDB is not in the official CentOS repository, so to install it, you'll have to enable the official MongoDB repository. This will give you access to the latest packages and allow you to install it from there.
For this tutorial, we'll be installing the community edition, which is available for free download. There's also an enterprise edition, but that requires a license, so we won't be dealing with it here.
At time of publication, MongoDB 4.0 is the latest stable edition available for download and installation . To enable the repository, create a file in the CentOS repository (/etc/yum.repos.d/) called mongodb-org-4.0.repo so that you can install MongoDB directly using yum. Using vi or your favorite text editor:
sudo vi /etc/yum.repos.d/mongodb-org-4.0.repoTo point the package manager to the official MongoDB repository and enable it, copy and paste the following into the file.
[mongodb-org-4.0]
name=MongoDB Repository
baseurl=https://repo.mongodb.org/yum/redhat/$releasever/mongodb-org/4.0/x86_64/
gpgcheck=1
enabled=1
gpgkey=https://www.mongodb.org/static/pgp/server-4.0.asc
Setting enabled=1 enables the repository and setting gpgcheck=1 turns on GPG (GNU Privacy Guard) signature checking on all packages installed from the repository.
Note: You can find .repo files for each release in the repository itself. Odd-numbered minor release versions (e.g. 3.5) are development versions and are unsuitable for production use.
Save and close the file, then install the mongodb-org package to install MongoDB and its related tools:
sudo yum install -y mongodb-orgTo install a specific release of MongoDB, specify each component package individually and append the version number to the package name, as in the following example:
sudo yum install -y mongodb-org-4.0.6 mongodb-org-server-4.0.6 mongodb-org-shell-4.0.6 mongodb-org-mongos-4.0.6 mongodb-org-tools-4.0.6After installation has completed, start the MongoDB daemon.
sudo systemctl start mongodThe MongoDB daemon (mongod) should now be running, and you can verify that using the following command:
sudo systemctl status mongodIf it's running, the output should look like the following:
mongod.service - SYSV: Mongo is a scalable, document-oriented database.
    Loaded: loaded (/etc/rc.d/init.d/mongod)
    Active: active (running) since Tue 2016-09-06 12:42:16 UTC; 9s ago
       Docs: man:systemd-sysv-generator(8)
    Process: 9374 ExecStart=/etc/rc.d/init.d/mongod start (code=exited, status=0/SUCCESS)
       CGroup: /system.slice/mongod.service
               └─9385 /usr/bin/mongod -f /etc/mongod.conf

Mar 03 12:42:16 centos-meancoresystemd[1]: Starting SYSV: Mongo is a scalable, document-oriented database....
Mar 03 12:42:16 centos-meancorerunuser[9381]: pam_unix(runuser:session): session opened for user mongod by (uid=0)
Mar 03 12:42:16 centos-meancoremongod[9374]: Starting mongod: [  OK  ]
Mar 03 12:42:16 centos-meancoresystemd[1]: Started SYSV: Mongo is a scalable, document-oriented database..
The next part of the stack we need to install is Node.js.
3. Installing Node.js
You can find the Linux binary packages by navigating to the Node.js Downloads page and locating the Linux Binaries download links. Since CentOS 7 only comes in the 64-bit architecture, right click on the Linux Binaries (x64) link labeled 64-bit and select Copy link address or whatever similar option your browser provides. At the time of this writing, the latest LTS release is 10.15.2. If you prefer to install the latest stable release of Node.js, go to the appropriate page and copy that link.
On your server, change to your home directory and use the wget utility to download the files. Paste the URL you just copied as the argument for the command:
cd ~
wget https://nodejs.org/dist/v10.15.2/node-v10.15.2-linux-x64.tar.xzNote: Your version number in the URL is likely to be different than the one above. Use the address you copied from the Node.js site rather than the specific URL provided in this guide.
Next, we will extract the binary package into our system's local package hierarchy with the tar command. The archive is packaged within a versioned directory, which we can get rid of by passing the --strip-components=1 option. We will specify the target directory of our command with the -C command:
mkdir node
tar xvf node-v*.tar.gz --strip-components=1 -C ./node
This will install all the components within a new node branch of your system.
If you want to delete the Node.js archive that you downloaded, since we no longer need it, change to your home directory and use this rm command:
cd ~
rm -rf node-v*
Next, we'll configure the global prefix of NPM, where NPM will create symbolic links to installed Node packages, to somewhere that it's in your default path. We'll set it to /usr/local with this command:
mkdir node/etc
echo 'prefix=/usr/local' > node/etc/npmrc
Now we're ready to move the Node.js and NPM binaries to our installation location. We'll move it into /opt/node with this command:
sudo mv node /opt/At this point, you may want to make root the owner of the files:
sudo chown -R root: /opt/nodeLastly, let's create symbolic links of the Node.js and NPM binaries in your default path. We'll put the links in /usr/local/bin with these commands:
sudo ln -s /opt/node/bin/node /usr/local/bin/node
sudo ln -s /opt/node/bin/npm /usr/local/bin/npm
Note: By default, /usr/local/bin is excluded from PATH when sudo is used. To change that, open the sudoers file:
sudo visudoFind the line that specifies Defaults secure_path and add :/usr/local/bin to the end of it. It should look like this when you're done:
Defaults secure_path = /sbin:/bin:/usr/sbin:/usr/bin:/usr/local/binSave and exit.
The Node.js runtime is now installed, and ready to run an application! You can now begin using Node.js on your CentOS 7 server. Since NPM is installed, we can install the rest of the components of the MEAN stack.
4. Installing Angular-CLI
Installing Angular manually was cumbersome, but thanks to the development team for introducing the Angular CLI. Angular CLI jump starts the development with Angular, it’s a mere command-line interface allowing users, from creating to deploying an Angular application. Once installed, Angular CLI provides a command-line utility ng to handle anything related to Angular.
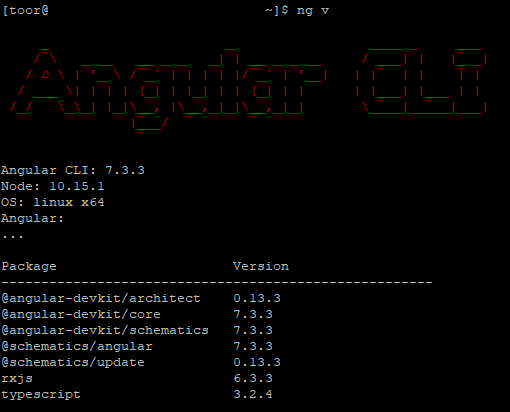
npm install -g @angular/cliTo verify the installation was successfully, simply run the command ng v:
5. Installing the MEAN Boilerplate
For the purpose of this tutorial, we use a MEAN starter kit called MEANcore which provides a solid starting point for MongoDB, Node.js, Express, and Angular based applications. The first thing to do is clone the official MEANcore GitHub repository:
git clone https://github.com/mrdav30/MEANcore.git meancoreThat clones the MEAN boilerplate into a directory called meancore in your home directory. To install all the packages the project references, you need to be inside that directory, so move into it:
cd ./meancoreThen install the required packages as the admin user:
npm installThe installation will take several minutes. When it completes, create a .env file in the project folder and fill in the following values:
NODE_ENV='development'
PRODUCTION=false
DOMAIN=
DOMAIN_PATTERN=
HOST_SECURE=
PROXY=

APP_NAME='meancore'
APP_BASE_URL='/'
API_BASE_URL='api'
APP_DEFAULT_ROUTE='home'
IMAGE_UPLOAD_URL='/admin/upload'
TWITTER_HANDLE=

SESSION_SECRET='MEANCORE'
SESSION_KEY='meancore-key'
SESSION_COLLECTION='meancore-sessions'

GOOGLE_ANALYTICS_ID=''
GOOGLE_CLIENT_EMAIL=''
GOOGLE_PRIVATE_KEY=""
GOOGLE_VIEW_ID=
RECAPTCHA_SECRET_KEY=''
RECAPTCHA_SITE_KEY=''

MAILER_FROM='support@meancore.com'
MAILER_SERVICE_PROVIDER=
MAILER_HOST='smtp.ethereal.email'
MAILER_PORT=587
MAILER_USER="username"
MAILER_SECRET="pass"
MAILER_TEST=true
Now you have everything you need to develop a MEAN application. In the next step, we'll test the stack to make sure it works.
6. Running Your MEAN Application
Let's run the sample application to make sure that the system is functioning correctly by running the following command to test the application in development mode:
npm run start:dev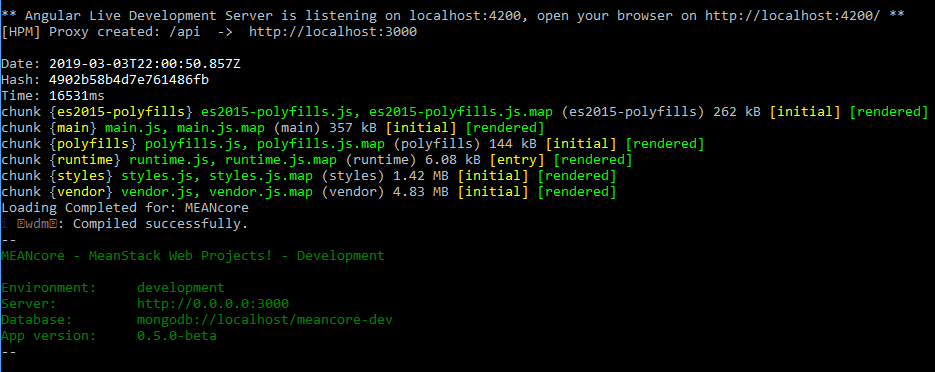
The Angular application should now be accessible at http://{{SERVER_IP_ADDRESS}}:4200 – you can verify it in your browser. That should render a page with the MEANcore logo, including the text Congrats! You've configured and run the sample application. This means you have a fully functional MEAN stack on your server.
Now we'll take some additional steps to ensure your application remains running with PM2 and also secured behind a reverse proxy with Nginx.
7. Installing PM2
Now we will install PM2, which is a process manager for Node.js applications. PM2 provides an easy way to manage and daemonize applications (run them as a service).
We will use NPM (Node Package Manager), which is a package manager for Node modules that installs with Node.js, to install PM2 on our app server. Use this command to install PM2:
sudo npm install pm2@latest -gManage Application with PM2
PM2 is simple and easy to use. We will cover a few basic uses of PM2.
Start Application
The first thing you will want to do is use the PM2 start command to run your application, server.js, in the background:
pm2 start server.jsThis also adds your application to PM2's process list, which is outputted every time you start an application:

As you can see, PM2 automatically assigns an App name (based on the filename, without the .js extension) and a PM2 id. PM2 also maintains other information, such as the PID of the process, its current status, and memory usage.
Applications that are running under PM2 will be restarted automatically if the application crashes or is killed, but an additional step needs to be taken to get the application to launch on system startup (boot or reboot). Luckily, PM2 provides an easy way to do this, the startup sub-command.
The startup sub-command generates and configures a startup script to launch PM2 and its managed processes on server boots. You must also specify the init system you are running on, which is systemd, in our case:
sudo pm2 startup systemdYou should see output like the following, which indicates that the PM2 service has been installed.
[PM2] Generating system init script in /etc/systemd/system/pm2.service
[PM2] Making script booting at startup...
[PM2] -systemd- Using the command:
    su root -c "pm2 dump && pm2 kill" && su root -c "systemctl daemon-reload && systemctl enable pm2 && systemctl start pm2"
[PM2] Dumping processes
[PM2] Stopping PM2...
[PM2] All processes have been stopped and deleted
[PM2] PM2 stopped
[PM2] Done.
Now your PM2 managed applications should start automatically on boot.
Optional - Other PM2 Usage
PM2 provides many sub-commands that allow you to manage or look up information about your applications.
Note: Running PM2 without any arguments will display a help page, including example usage, that covers PM2 usage in more detail than this section of the tutorial.
Stop an application with this command (specify the PM2 App name or Id):
pm2 stop exampleRestart an application with this command (specify the PM2 App name or Id):
pm2 restart exampleThe list of applications currently managed by PM2 can also be looked up with the list sub-command:
pm2 listMore information about a specific application can be found by using the info sub-command (specify the PM2 App name or Id):
pm2 info exampleThe PM2 process monitor can be pulled up with the monit sub-command. This displays the application status, CPU, and memory usage:
pm2 monitNow that your Node.js application is running, and managed by PM2, let's set up the reverse proxy.
8. Setup Reverse Proxy Server with NGINX
Now that your application is running, and listening on a private IP address, you need to set up a way for your users to access it. We will set up a NGINX web server as a reverse proxy for this purpose. This tutorial will set up a NGINX server from scratch. If you already have a NGINX server setup, you can just copy the location block into the server block of your choice (make sure the location does not conflict with any of your web server's existing content).
On the web server, let's install the epel-release package using yum:
sudo yum install epel-releaseThen install NGINX:
sudo yum install nginxNow open the NGINX configuration file for editing:
sudo vi /etc/nginx/nginx.confFind the line where location / is defined, within the default server block. It should look something like this:
location / {
}
Replace it with the following code block and be sure to substitute your own domain name for the server_name directive (or IP address if you don't have a domain set up), and the app server private IP address for the APP_PRIVATE_IP_ADDRESS. Additionally, change the port (8080) if your application is set to listen on a different port:
location / {
    proxy_pass http://APP_PRIVATE_IP_ADDRESS:8080;
    proxy_http_version 1.1;
    proxy_set_header Upgrade $http_upgrade;
    proxy_set_header Connection 'upgrade';
    proxy_set_header Host $host;
    proxy_cache_bypass $http_upgrade;
}
This configures the web server to respond to requests at its root. Assuming our server is available at example.com, accessing http://example.com/ via a web browser would send the request to the application server's private IP address on port 8080, which would be received and replied to by the Node.js application.
You can add additional location blocks to the same server block to provide access to other applications on the same web server. For instance, if you were also running another Node.js application on the app server on port 8081, you could add this location block to allow access to it via http://example.com/app2:
location /app2 {
    proxy_pass http://APP_PRIVATE_IP_ADDRESS:8081;
    proxy_http_version 1.1;
    proxy_set_header Upgrade $http_upgrade;
    proxy_set_header Connection 'upgrade';
    proxy_set_header Host $host;
    proxy_cache_bypass $http_upgrade;
}
Once you are done adding the location blocks for your applications, save and exit.
On the web server, restart NGINX and enable it to start on boot:
sudo systemctl restart nginx
sudo systemctl enable nginx
If your Node.js application is running, and your application and NGINX configurations are correct, you should be able to access your application via the reverse proxy of the web server. Try it out by accessing your web server's URL (its public IP address or domain name).
Conclusion
Congratulations! You now have your Node.js application running behind a NGINX reverse proxy. This reverse proxy setup is flexible enough to provide your users access to other applications or static web content that you want to share.
You're also now set up to run MEAN Stack applications on your CentOS machine. Now that you have the necessary components and the MEAN boilerplate, you can begin building, testing and deploying your own apps. Check out the documentation on MEANcore website for specific help on working with MEANcore and good luck with your Node.js development!
If you any questions or thoughts on the tutorial, feel free to reach out in the comments below.
Additional Reading