

Introduction
When you first create a new server, there are a few configuration steps that you should take early on as part of the basic setup. This will increase the security and usability of your server and will give you a solid foundation for subsequent actions.
1. Root Login
To login to your server, you will need to know your server's public IP address and the password for the root user account. If you are not already connected to your server, go ahead and log in as the root user using the following command (substitute SERVER_IP_ADDRESS with your server's public IP address):
ssh root@SERVER_IP_ADDRESSComplete the login process by accepting the warning about host authenticity, if it appears, then providing your root authentication (password or private key). If it is your first-time logging into the server, with a password, you will also be prompted to change the root password.
The root user is the administrative user in a Linux environment that has very broad privileges. Because of the heightened privileges of the root account, you are discouraged from using it on a regular basis. This is because part of the power inherent with the root account is the ability to make very destructive changes, even by accident.
The next step is to set up an alternative user account with a reduced scope of influence for day-to-day work.
2. Create New User
Once you are logged in as root, we're prepared to add the new user account that we will use to log in from now on.
This example creates a new user called toor, but you should replace it with a user name that you like:
adduser toorNext, assign a password to the new user (again, substitute toor with the user that you just created):
passwd toorEnter a strong password and repeat it again to verify it.
3. Root Privileges
Now, we have a new user account with regular account privileges. However, we may sometimes need to do administrative tasks.
To avoid having to log out of our normal user and log back in as the root account, we can set up what is known as super user or root privileges for our normal account. This will allow our normal user to run commands with administrative privileges by putting the word sudo before each command.
To add these privileges to our new user, we need to add the new user to the wheel group. By default, on CentOS 7, users who belong to the wheel group can use the sudo command.
As root, run this command to add your new user to the wheel group (substitute toor with your new user):
gpasswd -a toor wheelNow your user can run commands with super user privileges!
4. Add Public Key Authentication
The next step in securing your server is to set up public key authentication for your new user. Setting this up will increase the security of your server by requiring a private SSH key to log in.
Generate a Key Pair
If you do not already have an SSH key pair, which consists of a public and private key, you need to generate one. If you already have a key that you want to use, skip to the Copy the Public Key step.
To generate a new key pair, enter the following command at the terminal of your local machine:
ssh-keygenAssuming your local user is called localuser, you will see output that looks like the following:
## ssh-keygen output
Generating public/private rsa key pair.
Enter file in which to save the key (/Users/localuser/.ssh/id_rsa):
Hit return to accept this file name and path (or enter a new name).
Next, you will be prompted for a passphrase to secure the key with. You may either enter a passphrase or leave the passphrase blank.
Note: If you leave the passphrase blank, you will be able to use the private key for authentication without entering a passphrase. If you enter a passphrase, you will need both the private key and the passphrase to log in. Securing your keys with passphrases is more secure, but both methods have their uses and are more secure than basic password authentication.
This generates a private key (id_rsa) and a public key (id_rsa.pub) in the .ssh directory of the localuser home directory. Remember that the private key should not be shared with anyone who should not have access to your servers!
Copy the Public Key
After generating an SSH key pair, you will want to copy your public key to your new server. There are two easy ways to do this.
Option 1: Use ssh-copy-id
If your local machine has the ssh-copy-id script installed, you can use it to install your public key to any user that you have login credentials for.
Run the ssh-copy-id script by specifying the user and IP address of the server that you want to install the key on, like this:
ssh-copy-id toor@SERVER_IP_ADDRESSAfter providing your password at the prompt, your public key will be added to the remote user's .ssh/authorized_keys file. The corresponding private key can now be used to log into the server.
Option 2: Manually Install the Key
Assuming you generated an SSH key pair using the previous step, use the following command at the terminal of your local machine to print your public key (id_rsa.pub):
cat ~/.ssh/id_rsa.pubThis should print your public SSH key, which should look something like the following:
##  id_rsa.pub contents
ssh-rsa AAAAB3NzaC1yc2EAAAABIwAAAQEAmLmwkzQDjEOW1Rj3TP5NldVDqUODVH9xuYrkeaSkxtdP
J8D9Hz+XAWnGAXdaIkCVOw2YEfHKWSo6befgNxiS+AKS+S+wM/bJpc4qOLe5ozFjZPNRHcw5O8WkgP5g
/wg2BOvxBqSKpsSzvi4rYVRLtl7TLVMyajhELiJ9GqT8f25gr3jFmtuQQIkRES1aC4oL2tHsn529POfP
1lPhh5tb2FbqEpm9L3779ljjkSX7mD4zza3zUckkuAIb5R7KSOrvPnJaEU903hrI0tx5omGyDy+h/2D1
h0aqHanPcU9Ml91ZpMKdpa0+FeVgs2M3LHYTNnvZ76ScV2VtUQwm3YEvjw== localuser@machine.local
Select the public key and copy it to your clipboard.
To enable the use of SSH key to authenticate as the new remote user, you must add the public key to a special file in the user's home directory.
On the server, as the root user, enter the following command to switch to the new user (substitute your own user name):
su - toorNow you will be in your new user's home directory.
Create a new directory called .ssh and restrict its permissions with the following commands:
mkdir .ssh
chmod 700 .ssh
Now open a file in .ssh called authorized_keys with a text editor. We will use vi to edit the file:
vi .ssh/authorized_keysEnter insert mode, by pressing i, then enter your public key (which should be in your clipboard) by pasting it into the editor. Now hit ESC to leave insert mode.
Enter :x then ENTER to save and exit the file.
Now restrict the permissions of the authorized_keys file with this command:
chmod 600 .ssh/authorized_keysType this command once to return to the root user:
exitNow you may SSH login as your new user, using the private key as authentication.
5. Configure SSH Daemon
Now that we have our new account, we can secure our server a little bit by modifying its SSH daemon configuration (the program that allows us to log in remotely) to disallow remote SSH access to the root account.
Begin by opening the configuration file with your text editor as root:
vi /etc/ssh/sshd_configHere, we have the option to disable root login through SSH. This is generally a more secure setting since we can now access our server through our normal user account and escalate privileges when necessary.
To disable remote root logins, we need to find the line that looks like this:
#PermitRootLogin yesHint: To search for this line, type /PermitRoot then hit ENTER. This should bring the cursor to the P character on that line.
Uncomment the line by deleting the # symbol (press Shift-x).
Now move the cursor to the yes by pressing c.
Now replace yes by pressing cw, then typing in no. Hit ESC when you are done editing. It should look like this:
PermitRootLogin noDisabling remote root login is highly recommended on every server!
Enter :x then ENTER to save and exit the file.
Reload SSH
Now that we have made our changes, we need to restart the SSH service so that it will use our new configuration.
Type this to restart SSH:
systemctl reload sshdNow, before we log out of the server, we should test our new configuration. We do not want to disconnect until we can confirm that new connections can be established successfully.
Open a new terminal window. In the new window, we need to begin a new connection to our server. This time, instead of using the root account, we want to use the new account that we created.
For the server that we configured above, connect using this command. Substitute your own information where it is appropriate:
ssh toor@SERVER_IP_ADDRESSNote: If you are using PuTTY to connect to your servers, be sure to update the session's port number to match your server's current configuration.
You will be prompted for the new user's password that you configured. After that, you will be logged in as your new user.
Remember, if you need to run a command with root privileges, type sudo before it like this:
sudo command_to_runIf all is well, you can exit your sessions by typing:
exitNow that the server has been setup for SSH, we'll review how to configure PuTTy to allow secure connections.
6. Configuring PuTTY
PuTTY is an open-source SSH and Telnet client for Windows. It allows you to securely connect to remote servers from a local Windows computer.
If you don’t have PuTTY installed, visit the Download PuTTY site and choose the Windows installer from the Package files list. Once PuTTY is installed, start the program.
On the PuTTY Configuration screen that opens, fill in the field labeled Host Name (or IP Address) with your server’s IP address. Confirm that the Port is set to 22 and that the Connection type SSH is selected.

Next, click on SSH in the left sidebar (under Connection). Make sure 2 is selected for the SSH protocol version. To create and use SSH keys on Windows, you need to download PuTTYgen, a utility used to create SSH keys.
On the PuTTY website, download the .msi file in the Package files section at the top of the page, under MSI (‘Windows Installer’). Next, install it on your local computer by double clicking it and using the installation wizard.
After the programs are installed, start the PuTTYgen program through your Start Menu or by tapping the Windows key and type puttygen. The key generation program looks like this:
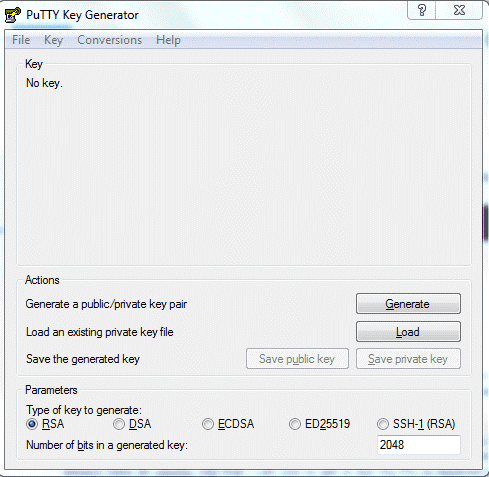
You can customize the Parameters at the bottom if you like, but the default values are appropriate in most situations. Select Load and navigate to the id_rsa.pub you created earlier. Click the Save private key button and select a secure location to keep it. You can name your key whatever you’d like, and the extension .ppk will be automatically added.
Once you created an SSH key pair, you can add them in the Auth subcategory of PuTTY.
In the Private key file for authentication section, click the Browse button.
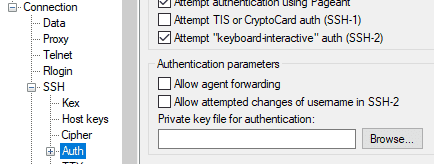
Search for the private key file that you saved. This is the key that ends in .ppk. Find it and select Open in the file window.
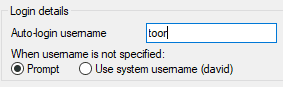
Next, in the Connection subheading in the Data configuration section, enter your server’s username in the Auto-login username field. For the initial setup, this should be the root user, which is the administrative user of your server.
Finally, you can save these preferences to avoid typing them manually in the future. Click on Session in the left sidebar, then add a name in the text box under Saved Sessions and click Save on the right.
You now have saved all the configuration data needed to connect to your new server.
7. Connecting with PuTTY
Once you have a session saved, you can recall these values at any time by returning to the Session screen, selecting the session you would like to use in the Saved Sessions section, and clicking Load to recall the settings. This will auto-fill all the fields with the values you initially selected.
Before you connect to a server for the first time, PuTTY will ask you to confirm that you trust the server. Choose Yes to save the server identity in PuTTY’s cache or No to connect without saving the identity.
After PuTTY starts, type in the root password that was emailed to you. If you uploaded SSH keys, you will either be connected directly or prompted for the password you set on your key.
When you have successfully authenticated, you will be connected to your server.
Conclusion
At this point, you have a solid foundation for your server. You can install any of the software you need on your server now.
If you any questions or thoughts on the tutorial, feel free to reach out in the comments below.