Introduction
Analytics reports help you clearly understand how your users are behaving and enable you to make informed decisions about marketing and performance optimization.
Google offers an excellent NPM package: googleapis. We are going to use this as the main building block of our API interaction.
Authentication is an important part of API communication. When accessing Google APIs from the back end, we need our server to authenticate with Google to access its APIs (in our case, Google Analytics). To do this, you first need to create a special account called a "Service Account".
If you are unfamiliar with this process, read this article“How to Setup Authentication for Any Google API”.
For this article, we assume that you have read and understood this concept and know how to perform JWT authentication.
This article is aimed at using the Google Analytics Core Reporting API v3 with Node.js. This article will be updated to reflect the changes in v4 once it is out of alpha stage for Node.js.
Environment Variables
After getting the JSON Key file from Google, set the client_email and private_key as environment variables so that they are accessible via:
- process.env.CLIENT_EMAIL
- process.env.PRIVATE_KEY
Add User to Google Analytics
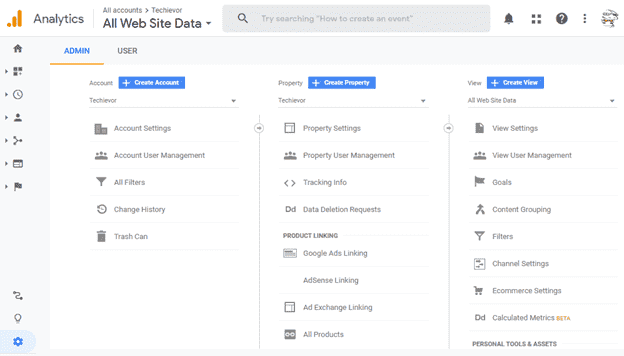
Since these examples use a service-to-service API, you need to add client_email to your Google Analytics profile. Go to the Admin panel in Google Analytics and you will find three different areas:
- Account
- Property
- View

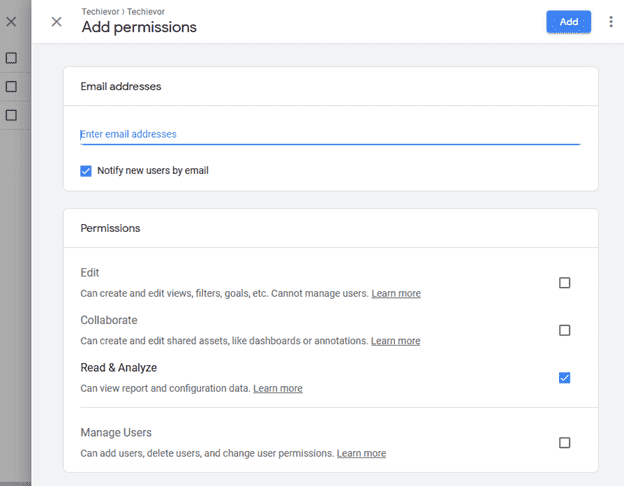
First, create a new user in Property -> Property User Management and click the plus icon to select Add users:

Use the email address associated with the client_email key in the JSON file and set the user’s permissions to Read & Analyze.

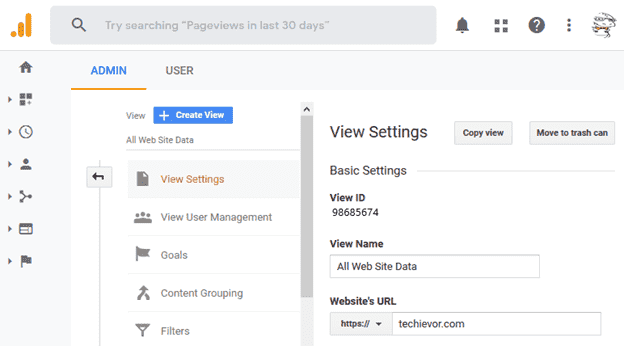
Now, navigate to View -> View Settings and copy the View ID (i.e. 98685674) for later.

Using the Google APIs Package
Now that we have our key and account, everything is set up and we are ready to go. Let us continue by creating a module called analytics that will monitor the communication with the Google Analytics API.
Import the Google Library
First, import the Google APIs module as follows:
const{ google } = require('googleapis');Do not forget the {} around the google object. We need to destructure it from the googleapis library (otherwise we would need to call google.google).
Define the scope
This line sets the scope:
const scopes ='https://www.googleapis.com/auth/analytics.readonly';Google Analytics API defines several scopes:
- https://www.googleapis.com/auth/analytics.readonly to view the data
- https://www.googleapis.com/auth/analytics to view and manage the data
- https://www.googleapis.com/auth/analytics.edit to edit the management entities
- https://www.googleapis.com/auth/analytics.manage.users to manage the account users and permissions
- https://www.googleapis.com/auth/analytics.manage.users.readonly to view the users and their permissions
- https://www.googleapis.com/auth/analytics.provision to create new Google Analytics accounts
You should always pick the scope that grants the least amount of power.
Since we want to only view the reports now, we pick https://www.googleapis.com/auth/analytics.readonly instead of https://www.googleapis.com/auth/analytics.
The Google Analytics Reporting API
Note: You can also use the Google Analytics Reporting API to access those permissions.
This is a trimmed-down version of the Google Analytics API, offering just the scope https://www.googleapis.com/auth/analytics.readonly and https://www.googleapis.com/auth/analytics.
However, this API is slightly different than the Analytics API in how it is used and in which methods it exposes, so we will skip that.
Create the JWT
We need to verify the authentication before we can send requests to the Google Analytics API. Server authentication is done using JWT. To authenticate with JWT, we refer to the two environment variables we set at the beginning that point to client_email and private_key. Add the following snippet below the scopes object declaration:
const authClient = newgoogle.auth.JWT(process.env.CLIENT_EMAIL,null, process.env.PRIVATE_KEY, scopes);To perform the actual authentication, we can call the authorize method of the authClient object as follows:
authClient.authorize(function (err, tokens) {

});
If everything works as expected, our callback function should not return an err object (preferably you should add such a check before moving on).
Perform a request
Check out this example code:
const { google } = require('googleapis');
const scopes = 'https://www.googleapis.com/auth/analytics.readonly';
const authClient = new google.auth.JWT(process.env.CLIENT_EMAIL,null, process.env.PRIVATE_KEY, scopes);

const view_id ='ga:XXXXX';

async functiongetData() {
  const response = await authClient.authorize();
  const result = await google.analytics('v3').data.ga.get({
    'auth': authClient,
    'ids':'ga:'+ view_id,
    'start-date':'30daysAgo',
    'end-date':'today',
    'metrics':'ga:pageviews'
  });

  console.dir(result);
}

getData();
This code snippet makes a request to the Google Analytics API to get the number of page views in the last 30 days.
Since we are going to communicate with Google Analytics asynchronously, we need to use async function calls.
In the above code, a result object defines our service client and chains a get method to interact with the Google Analytics API.
Each Google API has its own service client. For example: google.drive (‘v2’) for Google Drive or google.urlshortener (‘v1’) for Google URL Shortening services.
In the get request method, we pass an object that tells the Google Analytics API who we are and what we want from it:
{
  'auth': authClient,
  'ids': 'ga:' + view_id,
  'start-date': '30daysAgo',
  'end-date': 'today',
  'metrics': 'ga:pageviews'
}
The authClient is the object we created earlier that contains our key file and the permission we are looking for. We pass this object to the auth property.
The variable view_id contains the ID of the view that was copied earlier. You can find your View ID in the Google Analytics Admin Dashboard, under View -> View Settings -> View ID (not Google Analytics code, but the View ID).
Note: The ids property requires our Analytics View ID to be prefixed with ga:.
In addition to the authClient object and the view_id, we have 3 parameters:
- The metrics property tells the API what we want to get from Google Analytics. In this example, we specify pageviews for the metric, meaning we want to get the number of page views on our website. You can find a complete list of possible metrics in Google Dimensions & Metrics Explorer.
- The start-date and end-date properties specify the time range for the query. This query is very simple and returns the number of page views in a specified time.
The returned result will be something like this:
{
  status: 200,
  statusText: 'OK',
  headers: {...},
  config: {...},
  request: {...},
  data: {
    kind: 'analytics#gaData',
    id: 'https://www.googleapis.com/analytics/v3/data/ga?ids=ga:XXXXXXXXXXXXXXXXXX&metrics=ga:pageviews&start-date=30daysAgo&end-date=today',
    query: {
      'start-date': '30daysAgo',
      'end-date': 'today',
      ids: 'ga:XXXXXXXXXXXXXXXXXX',
      metrics: ['ga:pageviews'],
      'start-index': 1,
      'max-results': 1000
    },
    itemsPerPage: 1000,
    totalResults: 1,
    selfLink: 'https://www.googleapis.com/analytics/v3/data/ga?ids=ga:XXXXXXXXXXXXXXXXXX&metrics=ga:pageviews&start-date=30daysAgo&end-date=today',
    profileInfo: {
      profileId: 'XXXXXXXXXXXXXXXXXX',
      accountId: 'XXXXXXXXXXXXXXXXXX',
      webPropertyId: 'UA-XXXXXXXXXXX--XX',
      internalWebPropertyId:'XXXXXXXXXXXXXXXXXX',
      profileName: 'XXXXXXXXXXXXXXXXXX',
      tableId: 'ga:XXXXXXXXXXXXXXXXXX'
    },
    containsSampledData:false,
    columnHeaders: [
      {
        name: 'ga:pageviews',
        columnType: 'METRIC',
        dataType: 'INTEGER'
      }
    ],
    totalsForAllResults: {'ga:pageviews':'3000'},
    rows:[['114426']]
    }
}
This allows you to access the pageviews count in response.data.rows[0][0].
Metrics
The example above was simple, all we asked for was the number of page views in the last 30 days:
{
  'start-date': '30daysAgo',
  'end-date': 'today',
  'metrics': 'ga:pageviews'
}
With the Analytics API, we can do a lot more to extract data that we can use.
The Dimensions & Metrics Explorer provided by Google is a great tool for discovering all possible combinations.
These terms are two concepts of Google Analytics.
Dimensions are attributes or metadata that we are interested in (for example: city, country, page, referral path, or session duration).
Some examples of dimensions:
- ga:browser - get the browser type
- ga:city - get the city
Metrics are quantitative measurements (that is, number of users or number of sessions).
Some examples of metrics:
- ga:pageviews - get the pageviews
- ga:users - get the unique users
- ga:sessions - get the sessions
- ga:organicSearches - get the organic searches
The related properties of metrics and dimensions determine what type of data we would like to receive from Google Analytics.
Let us build some examples with these properties.
Examples - Common Code
Below is the generic code that we will use for the examples below. Place the relevant example snippet below the authorize() callback assigned to the response object.
'use strict'

const { google } = require('googleapis');
const scopes ='https://www.googleapis.com/auth/analytics.readonly';
const authClient = new google.auth.JWT(process.env.CLIENT_EMAIL,null, process.env.PRIVATE_KEY, scopes);

async function getData() {
  const defaults = {
    'auth': authClient,
    'ids': 'ga:'+ process.env.VIEW_ID
  };
  const response = await jwt.authorize();

  /* custom code goes here, using `response` */
}

getData();
The defaults object will be reused in the examples using the spread operator, a convenient way to use default values in JavaScript.
Get the number of today's sessions
const result = await google.analytics('v3').data.ga.get({
  ...defaults,
  'start-date': 'today',
  'end-date': 'today',
  'metrics': 'ga:sessions'
});

console.dir(result.data.rows[0][0]);
Get the number of today's sessions from organic sources (Search Engines)
We can filter the ga:sessions metric using a regular expression so that only results with specific criteria are returned. The property value is an ES6 tagged template, so we can use the backslash directly without escaping it. Add the filters property:
const result = await google.analytics('v3').data.ga.get({
  ...defaults,
  'start-date': 'today',
  'end-date': 'today',
  'metrics': 'ga:sessions',
  'filters': 'ga:medium==organic'
});

console.dir(result.data.rows[0][0]);
Get the number of yesterday's sessions
const result = await google.analytics('v3').data.ga.get({
  ...defaults,
  'start-date': 'yesterday',
  'end-date': 'yesterday',
  'metrics': 'ga:sessions'
});

console.dir(result.data.rows[0][0]);
Get the number of sessions in the last 30 days
const result = await google.analytics('v3').data.ga.get({
  ...defaults,
  'start-date': '30daysAgo',
  'end-date': 'today',
  'metrics': 'ga:sessions'
});

console.dir(result.data.rows[0][0]);
Get the browsers used in the last 30 days
const result = await google.analytics('v3').data.ga.get({
  ...defaults,
  'start-date': '30daysAgo',
  'end-date': 'today',
  'dimensions': 'ga:browser',
  'metrics': 'ga:sessions'
});

console.dir(result.data.rows.sort((a, b) => b[1]- a[1]));
Get the number of visitors using Chrome
const result = await google.analytics('v3').data.ga.get({
  ...defaults,
  'start-date': '30daysAgo',
  'end-date': 'today',
  'dimensions': 'ga:browser',
  'metrics': 'ga:sessions',
  'filters': 'ga:browser==Chrome'
});

console.dir(result.data.rows[0][1]);
Get the sessions by traffic source
const result = await google.analytics('v3').data.ga.get({
  ...defaults,
  'start-date': '30daysAgo',
  'end-date': 'today',
  'dimensions': 'ga:source',
  'metrics': 'ga:sessions'
});

console.dir(result.data.rows.sort((a, b) => b[1]- a[1]));
The Google Analytics Real Time API
The Google Real Time Reporting API is easy to work with.
However, the Google Analytics Real Time API [June 2020] is in a limited beta, and not publicly available. Check out the latest new here page.
You must register your project for access by filling out this form to register.
Note: Pay special attention to the instructions for finding your Project ID.
You will have to use a technique to poll the API from time to time to get updated results. Google Analytics rate limit is 50K per day.
After all that above… you can ping the API and get real-time results.
It is fun to mess around with different dimensions and metrics.
A good place to start is here.
Conclusion
For more information on the Analytics Reporting API, refer to the Google repository:
- A general overview of the Core Reporting API
- Documentation on the query parameters (the keys in the object handed to analytics.data.ga.get())
- Common queries (demonstrates how to use the keys documented by the link above)
If you any questions or thoughts on the tutorial, feel free to reach out in the comments below.

