Introduction
MongoDB is the most popular free and open-source NoSQL database. It is classified as a NoSQL database because it does not rely on the traditional table-based relational database structure. Unlike relational databases, documents are created and stored in BSON files, Binary JSON (JavaScript Object Notation) format, so all JS data types are supported. Additionally, MongoDB does not require a predefined schema, like fields or value types, before you add data to a database. This NoSQL solution also comes with embedding, auto-sharding, and on-board replication for better scalability and high availability.
MongoDB addresses an important aspect in application development today, when new trends and software development practices are emerging. Micro-services and continuous provision of services continue to become increasingly common, leading to changes in operational culture and organizational thinking. Development and operation teams can no longer work in isolated space but should be more closely connected to successfully deploy new features.
MongoDB meets these evolving organizational requirements and provides many benefits that are ideal for modern application development, such as:
- It is not based on an unnecessarily complex model data, therefore it’s easy for you to deploy it.
- It is built to scale horizontally and to replicate, which makes it easy to start small and grow big.
- It is conveniently flexible: it won’t pigeonhole your data into a rigid schema.
- It is built to flex easily to your needs and it’s conveniently easy to set up.
- It can accommodate huge loads of data.
In short, MongoDB powers agility.
Prerequisites
Before following this tutorial, make sure you have a regular, non-root user with sudo privileges.
Install MongoDB
For this tutorial, we’ll be installing MongoDB on Ubuntu. Ubuntu's official package repositories include an up-to-date version of MongoDB, which means we can install the necessary packages using apt.
First, update the packages list to have the most recent version of the repository listings:
sudo apt updateNow install the MongoDB package itself:
sudo apt install -y mongodbThis command installs several packages containing the latest stable version of MongoDB, along with helpful management tools for the MongoDB server. The database server is automatically started after installation.
The installation process started MongoDB automatically, but verify that the service is started and that the database is working correctly by checking the service's status:
sudo systemctl status mongodbYou should see this output:
mongodb.service - An object/document-oriented database
  Loaded: loaded (/lib/systemd/system/mongodb.service; enabled; vendor preset: enabled)
  Active: active (running) since Sat 2018-05-26 07:48:04 UTC; 2min 17s ago
    Docs: man:mongod(1)
Main PID: 2312 (mongod)
   Tasks: 23 (limit: 1153)
  CGroup: /system.slice/mongodb.service
     └─2312 /usr/bin/mongod --unixSocketPrefix=/run/mongodb --config /etc/mongodb.conf
According to systemd, the MongoDB server is up and running.
We can verify this further by connecting to the database server and executing a diagnostic command:
mongo --eval 'db.runCommand({ connectionStatus: 1 })' This will output the current database version, the server address and port, and the output of the status command:
MongoDB shell version v3.6.3
connecting to: mongodb://127.0.0.1:27017
MongoDB server version: 3.6.3
{
       "authInfo" : {
               "authenticatedUsers" : [ ],
               "authenticatedUserRoles" : [ ]
       },
       "ok" : 1
}
A value of 1 for the OK field in the response indicates that the server is working properly.
Manage MongoDB
MongoDB installs as a systemd service, which means that you can manage it using standard system commands alongside all other system services in Ubuntu.
To verify the status of the service, type:
sudo systemctl status mongodbYou can stop the server anytime by typing:
sudo systemctl stop mongodbTo start the server when it is stopped, type:
sudo systemctl start mongodbYou can also restart the server with a single command:
sudo systemctl restart mongodbBy default, MongoDB is configured to start automatically with the server. If you wish to disable the automatic startup, type:
sudo systemctl disable mongodbIt's just as easy to enable it again. To do this, use:
sudo systemctl enable mongodbOpen MongoDB for Outside Access
To access the database from outside the server, connect to the instance (insert your server IP and access key):
ssh -i /Users/yourusername/.ssh/yourkey root@123.123.123.123Now, bind the MongoDB to localhost. To allow remote connections, we will add our host's publicly routable IP address to the mongod.conf file. Edit the file /etc/mongod.conf with your favorite editor and add the MongoDB’s host IP to the bindIP line:
. . .
net:
  port: 27017
  bindIp: 127.0.0.1,IP_of_MongoHost
. . .
Next, we'll allow access to the default MongoDB port, 27017, but restrict that access to a specific host. If you use ufw (uncomplicated firewall), a default on Ubuntu instances, you can simply type:
sudo ufw allow from client_ip_address to any port 27017Re-run this command using the IP address for each additional client that needs access. To double-check the rule, we'll run:
sudo ufw statusOutput:
To                         Action      From
--                         ------      ----
OpenSSH                    ALLOW       Anywhere
27017                       ALLOW     client_ip_address
OpenSSH (v6)               ALLOW       Anywhere (v6)
Perfect! A restart of MongoDB will activate the settings:
sudo service mongod restartAs we did earlier, we'll confirm restart was successful:
sudo systemctl status mongodThe output should contain Active: active (running), and we can proceed to our final test.
Mongo is now listening on its default port and is now ready to accept outside connections. While you should be able to connect to your database from anywhere, authentication is still disabled by default, so any users on the local system have complete access to the databases. In the next step, we protect the database with the MongoDB authorization system.
Enable MongoDB Authorization
Next, we’ll make the database secure. Earlier versions of MongoDB were vulnerable to automated exploits, because by default no authentication was required to interact with the database. Any user could create and destroy databases, as well as read from and write to their contents by default. This was further complicated since those earlier versions also set up the MongoDB daemon to listen on all interfaces by default, which meant that automated scripts could detect instances of MongoDB that weren't protected by a firewall and, if authentication hadn't been enabled, get full access to the database.
The situation was mitigated in release 3.x, as well as earlier versions provided by some package managers since the daemon is now bound to 127.0.0.1, so it will only accept connections on the Unix socket.
Sometimes there are problems with the language environment variables in some regions. We can prevent this with a simple command:
export LC_ALL=CNow, enter the MongoDB shell and connect to the admin database:
mongo
use admin
Execute the following multi line command to create an admin user. Don’t forget to choose a secure password:
db.createUser(
  {
    user: "adminUser",
    pwd: "yourSecretPassword",
    roles: [ { role: "userAdminAnyDatabase", db: "admin" } ]
  }
)
At this point, our user will be allowed to enter credentials, but they will not be required to do since built-in MongoDB authorization system in disabled by default. To activate it, quit the MongoDB shell and change/add the corresponding lines in the file /etc/mongod.conf:
security:
  authorization: enabled
Note: The security line has no spaces at the beginning, and the authorization line must be indented with two spaces
We’re done with authorization! Simply restart MongoDB to apply the changes.
sudo service mongod restartOur MongoDB is secure now.
If you ever lock yourself out, then you need to do the following:
- Stop the MongoDB instance
- Remove the --auth and/or --keyfile options from your MongoDB config to disable authentication
- Start the instance without authentication
- Edit the users as needed
- Restart the instance with authentication enabled
Verifying MongoDB Authentication
First, let's connect without credentials to verify that our actions are restricted:
mongo We're connected to the test database. We'll test that our access is restricted with the show dbs command:
show dbs
2017-02-21T19:20:42.919+0000 E QUERY    [thread1] Error: listDatabases
failed:{
        "ok" : 0,
        "errmsg" : "not authorized on admin to execute command { listDatabases: 1.0 }",
        "code" : 13,        "codeName" : "Unauthorized"
}
We wouldn't be able to create users or similarly privileged tasks without authenticating. Exit the shell to proceed.
Next, we'll make sure our Administrative user does have access.
Connect as our administrator with the -u option to supply a username and -p to be prompted for a password. We will also need to supply the database where we stored the user's authentication credentials with the --authenticationDatabase option.
mongo -u adminUser -p --authenticationDatabase admin We'll be prompted for the password, so supply it. Once we enter the correct password, we'll be dropped into the shell, where we can issue the show dbs command. Rather than being denied access, we should see the available databases:
show dbsConnect to MongoDB Remotely
We’re ready to go to create databases from our local machine using the MongoDB shell. However, I prefer to use an interface to manage databases and recommend MongoDB Compass. MongoDB Compass allows document validation rules to be added from the GUI rather from the mongo shell command line. The installation is very straightforward, and it is available to all operating systems.
Use the following steps to connect and create databases on your remote MongoDB instance.
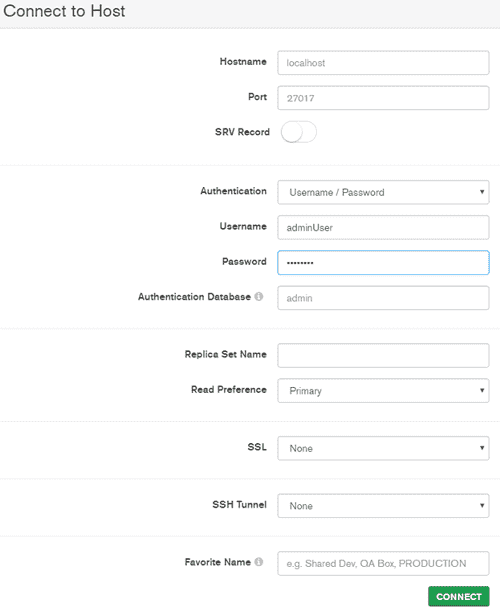
First, connect to the MongoDB instance with your admin credentials. You will need the host name and port from the connection string provided on the overview of your deployment, the user and password you want to use for MongoDB Compass, and a copy of the self-signed certificate for your deployment. For example:

Click on the Connect button to connect to your deployment.
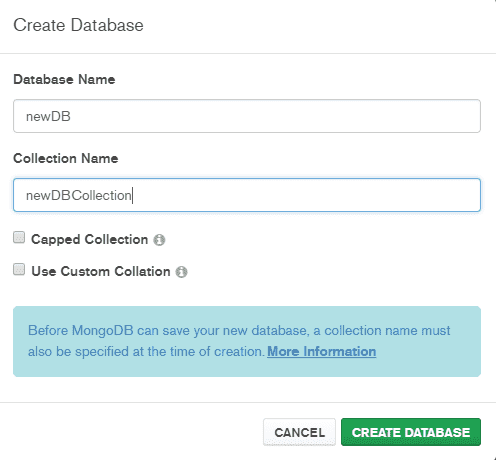
Once connected, simply click CREATE DATABASE and provide a database name and an initial collection.

Conclusion
In this tutorial, we've added the MongoDB repository to our package list to install the latest available version of MongoDB, added an administrative user, and enabled authentication.
We've also shown how to configure MongoDB to accept remote connections but prevent advertising the MongoDB installation by configuring the server's firewall to allow connections only from hosts that require access.
If you any questions or thoughts on the tutorial, feel free to reach out in the comments below.

